First of all, to those of you who have been anxiously awaiting my next live stream, I thank you for your patience. Many people have been asking me when my next stream is going to happen and I keep saying, "Soon™." Well, the answer is still "Soon™" but it is a much closer "Soon™" than the first one. XD Hehe. So, some of you may know that I'm not what most people would call a "professional gamer" and I don't intend to be one.. ever. But I do consider myself a part-time entertainer. I am still just an amateur however, and since gaming and streaming are just a hobby for me I don't yet have a set schedule for my live streams. I stream when I have the time and the drive, and to be completely honest with you I just haven't had the drive lately. BUT, I'm here to tell you that my motivation to stream again is coming back stronger than before and I've got to say that it's your persistence in asking me to stream again that is really, really helping! Seriously, you are the only reason I even want to stream. XD
 |
| Livestream preview screencap |
 |
| Schematic ^_^ |
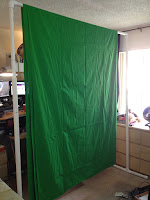
The design of the stand is very simple: just two upside-down "T" arms connected by the pipe that acts as the curtain rod at the top. I made mine with an adjustable height so that it can be as tall as 8 ft. and as short as 5.5 ft. and it is only 6 ft. wide since that is all the space I even have for it in my room! This complete setup including the cost of the 10' x 13' green screen itself ran me about $60 (that's including every detail down to the PVC cement and the hitch pins for the adjustable arms!) Similar "professional" green screen sets will run you about $100 at the cheapest, so I saved a few bucks. I also didn't really need the adjustable arms which would have saved me a few more dollars for less PVC, but I figured it would be a nice feature for when I want to take the green screen down for storage and for taking it with me places in my tiny Nissan Sentra. ^_^ When I break down the stand, it ends up in 5 pieces with the longest one being the 6 ft. curtain rod-pipe.
The whole thing took me under an hour to put together! All in all, I am very pleased with the way this turned out, and Xsplit has a built in Chroma-keyer, so I didn't need to invest in new software for streaming! If you are interested in building one of your own, I highly suggest visiting the following link since it is the main one I referred to when planning my own stand: http://blogs.adamparkerphotography.com/blog/Build-your-own-portrait-backdrop-stand/19/ There are many other tutorials for making these PVC stands, but this one I found to be the most simple. Good luck to you if you decide to build one of your own!
Thank you for letting me share my green screen adventure with you. If you'd like to know when my stream is going live next, please follow me on Twitter! I'm looking forward to seeing you in the stream chat and if you can't make it to the live broadcasts, I do intend to upload the streams and/or at least highlights to YouTube. =] It feels really great to finally get things together for you all and I'm so excited I could pop! Please tell me what you think of the pictures, and if you have any questions I'll try my best to answer them! See you soon!


No comments :
Post a Comment